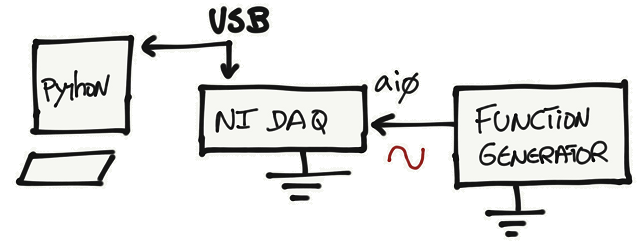
Single Analog Input – Finite
For this article I am going to show how to implement the finite single analog input mode from the test panel NI-MAX software. I encourage to test this mode first using the NI-MAX software in order to get a better feeling what are the pros and cons of this mode before looking at the python examples.

Intro
The finite mode can be used when the user wants to gather a predefined amount of data over a period of time without losing samples during that time. Have in mind that in this mode, it is not possible to visualize the received data. The user needs to wait until all the values are acquired before visualizing the data.
The Rate and Samples to Read parameters are used to set the required amount of data and acquisition time accordingly.
I will present below python examples that shows the analog reading on a terminal, and on a Graphical User Interface (GUI), so you can use the code that works best for your needs.
In general, data acquisition programming with DAQmx involves the following steps:
- Create a Task and Virtual Channels
- Configure the Timing Parameters
- Start the Task
- Perform a Read operation from the DAQ
- Perform a Write operation to the DAQ
- Stop and Clear the Task.
Terminal
I start with the terminal code because it is the easiest to follow and the GUI code builds from this one. You have access to the full code under the Python Files section.
Start by including the nidaqmx library. Change the device_name variable according to the name of your device. Change ai0 to any other analog input that you would like to use.
import nidaqmx
from nidaqmx import constants
import numpy as np

device_name = "6001_Dev1/ai0"
There are a couple of ways to write this code using the nidaqmx python drivers. This can be confusing at first but hopefully the examples below can show the differences.
ai_single_finite_v1()
This version creates the analog task using the nidaqmx.Task() function. After that, it parameterizes the analog channel, and sets the acquisition type to finite mode. The analog_task.read() function is set to READ_ALL_AVAILABLE, which means that this function waits for the task to acquire all requested samples, and then reads those samples to a numpy array. The array is printed to the terminal.
def ai_single_finite_v1():
    #  Create Task
    # --------------
    analog_task = nidaqmx.Task()

    #  Create Virtual Channel - Analog Input
    # --------------------------------------
    analog_task.ai_channels.add_ai_voltage_chan(physical_channel=device_name,
                                                name_to_assign_to_channel="",
                                                terminal_config=constants.TerminalConfiguration.RSE,
                                                min_val=-10.0,
                                                max_val=10.0,
                                                units=constants.VoltageUnits.VOLTS,
                                                custom_scale_name=None)

    #  Sets the source of the Sample Clock, the rate of the Sample
    #  Clock, and the number of samples to acquire or generate.
    Fs = 1000.0  # Hz
    samples_per_channel = 1000
    analog_task.timing.cfg_samp_clk_timing(rate=Fs,
                                           source=None,
                                           active_edge=nidaqmx.constants.Edge.RISING,
                                           sample_mode=nidaqmx.constants.AcquisitionType.FINITE,
                                           samps_per_chan=samples_per_channel)

    #  Start Task
    # -----------
    # no need to start task

    #  Acquire Analog Value
    # ---------------------

    # Initialize data array of input analog samples
    np_values = np.zeros(samples_per_channel, dtype=np.float64)

    # If the task acquires a finite number of samples and you
    # set this input to nidaqmx.constants.READ_ALL_AVAILABLE,
    # the method waits for the task to acquire all requested
    # samples, then reads those samples.
    np_values = analog_task.read(number_of_samples_per_channel=nidaqmx.constants.READ_ALL_AVAILABLE,
                                 timeout=nidaqmx.constants.WAIT_INFINITELY)

    print("Sample Size: " + str(len(np_values)))
    print(np_values)

    #  Stop and Clear Task
    # --------------------
    analog_task.stop()
    analog_task.close()
When tasks are created by calling nidaqmx.Task(), you are responsible to clear and close the task whenever you are done. If you don't do that, it will generate a resource warning when the program is done.

ai_single_finite_v2()
If you use the with statement instead of the nidaqmx.Task() to create a task, then you don't need to worry about clear and closing the task at the end. The rest of the code is exactly the same as the previous one.
def ai_single_finite_v2():
    #  Create Task
    # ------------
    with nidaqmx.Task() as analog_task:

        #  Create Virtual Channel - Analog Input
        # --------------------------------------
        analog_task.ai_channels.add_ai_voltage_chan(physical_channel=device_name,
                                                    name_to_assign_to_channel="",
                                                    terminal_config=constants.TerminalConfiguration.RSE,
                                                    min_val=-10.0,
                                                    max_val=10.0,
                                                    units=constants.VoltageUnits.VOLTS,
                                                    custom_scale_name=None)

        #  Sets the source of the Sample Clock, the rate of the Sample
        #  Clock, and the number of samples to acquire or generate.
        Fs = 1000.0  # Hz
        samples_per_channel = 1000
        analog_task.timing.cfg_samp_clk_timing(rate=Fs,
                                               source=None,
                                               active_edge=nidaqmx.constants.Edge.RISING,
                                               sample_mode=nidaqmx.constants.AcquisitionType.FINITE,
                                               samps_per_chan=samples_per_channel)

        #  Start Task
        # -----------
        # no need to start task

        #  Acquire Analog Value
        # ---------------------

        # Initialize data array of input analog samples
        np_values = np.zeros(samples_per_channel, dtype=np.float64)

        # If the task acquires a finite number of samples and you
        # set this input to nidaqmx.constants.READ_ALL_AVAILABLE,
        # the method waits for the task to acquire all requested
        # samples, then reads those samples.
        np_values = analog_task.read(number_of_samples_per_channel=nidaqmx.constants.READ_ALL_AVAILABLE,
                                     timeout=nidaqmx.constants.WAIT_INFINITELY)

        print("Sample Size: " + str(len(np_values)))
        print(np_values)

        #  Stop and Clear Task
        # no need to include because "with" takes care of it.
Analog Input Configuration Functions
Change the parameters of the analog input virtual channel according to your application needs.
#  Create Virtual Channel - Analog Input
analog_task.ai_channels.add_ai_voltage_chan(
     physical_channel=device_name,
     name_to_assign_to_channel="",
     terminal_config=constants.TerminalConfiguration.RSE,
     min_val=-10.0,
     max_val=10.0,
     units=constants.VoltageUnits.VOLTS,
     custom_scale_name=None)
Change the sampling rate and number of samples per channel according to your application requirements.
#  Sets the source of the Sample Clock, the rate of the Sample
    #  Clock, and the number of samples to acquire or generate.
    Fs = 1000.0  # Hz
    samples_per_channel = 1000
    analog_task.timing.cfg_samp_clk_timing(rate=Fs,
                                           source=None,
                                           active_edge=nidaqmx.constants.Edge.RISING,
                                           sample_mode=nidaqmx.constants.AcquisitionType.FINITE,
                                           samps_per_chan=samples_per_channel)
Call the desired function from the main function.
if __name__ == "__main__":
    ai_single_finite_v1()
    # ai_single_finite_v2()
Result
Let's do a simple test and set the sampling frequency (Fs) to 1kHz and the number of samples (samples_per_channel) to 1000, which means that we will acquire 1 second worth of data. Let's also set the function generator to generate a sinusoidal wave form at 1Hz. With this parameters we should be able to acquire one full cycle of the input waveform.
If you run the code, you will see that the code will run for 1 second and display the acquired data on the terminal.

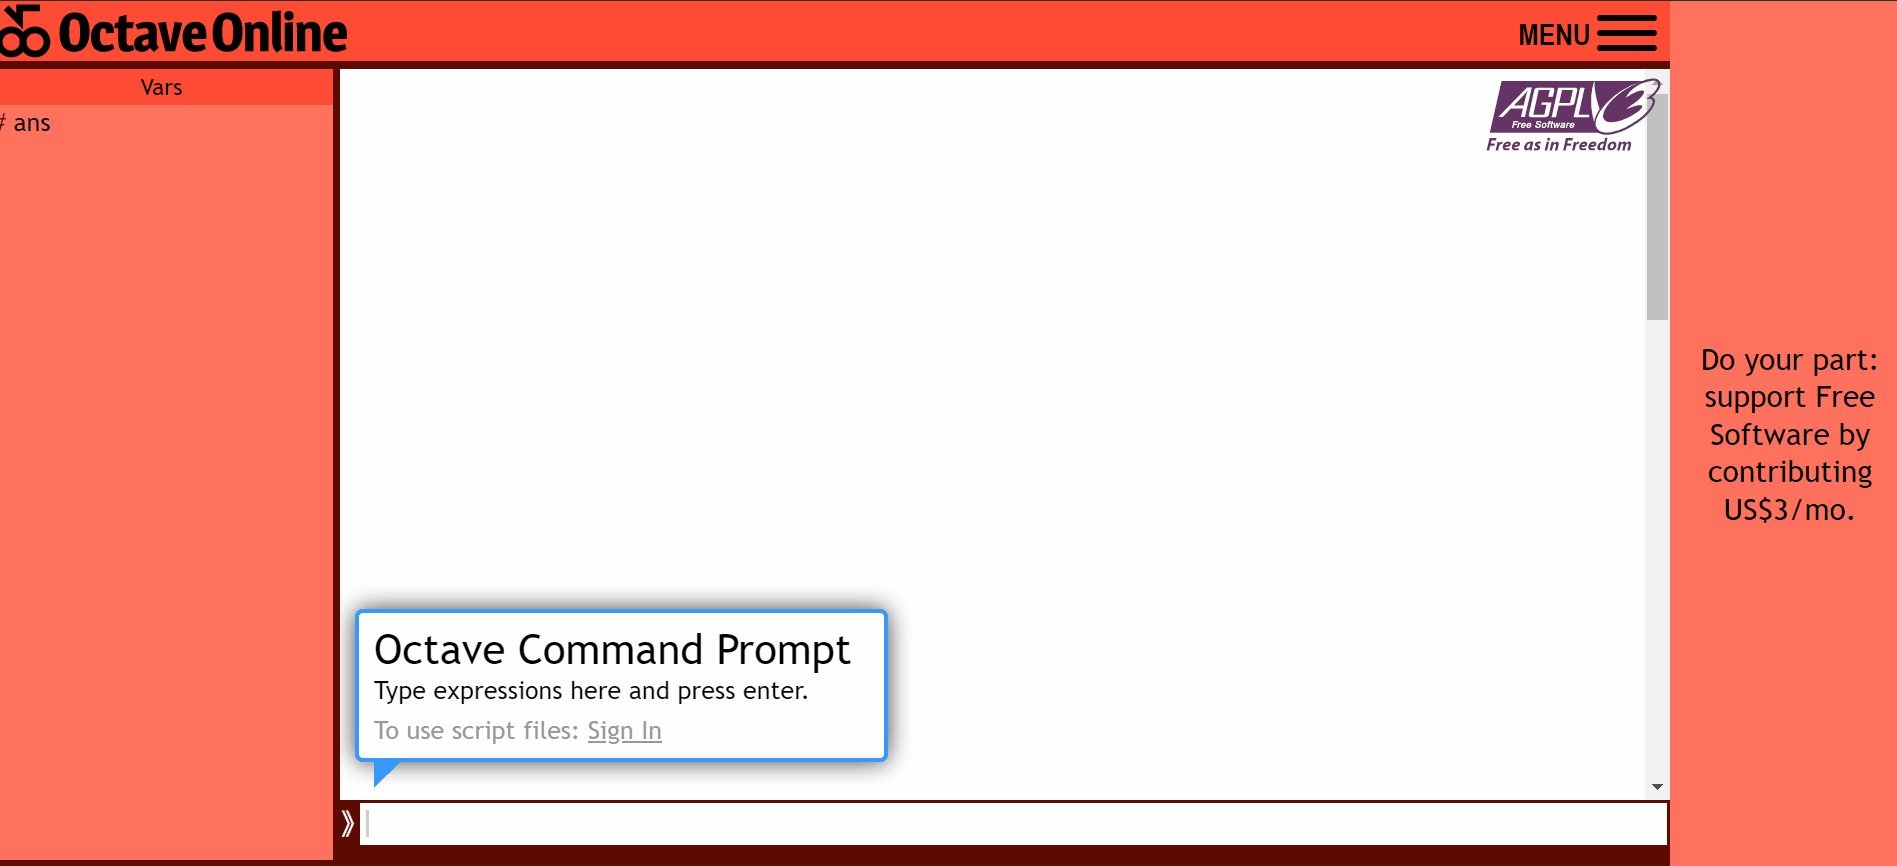
To validate that we are receiving the correct values, I copied the results from the terminal and use Octave Online to plot the data.
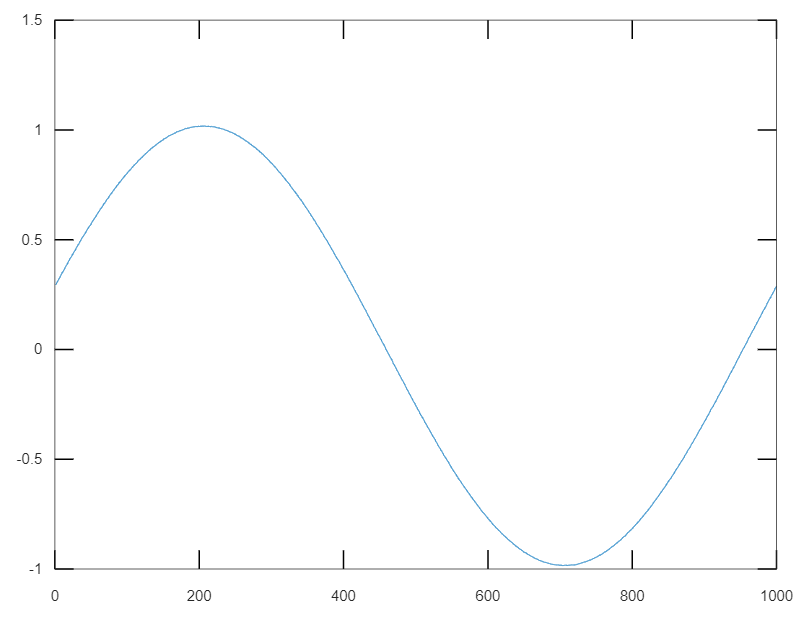
The acquired data is correct. I can see exactly one cycle of the 1Hz sinusoidal input waveform.
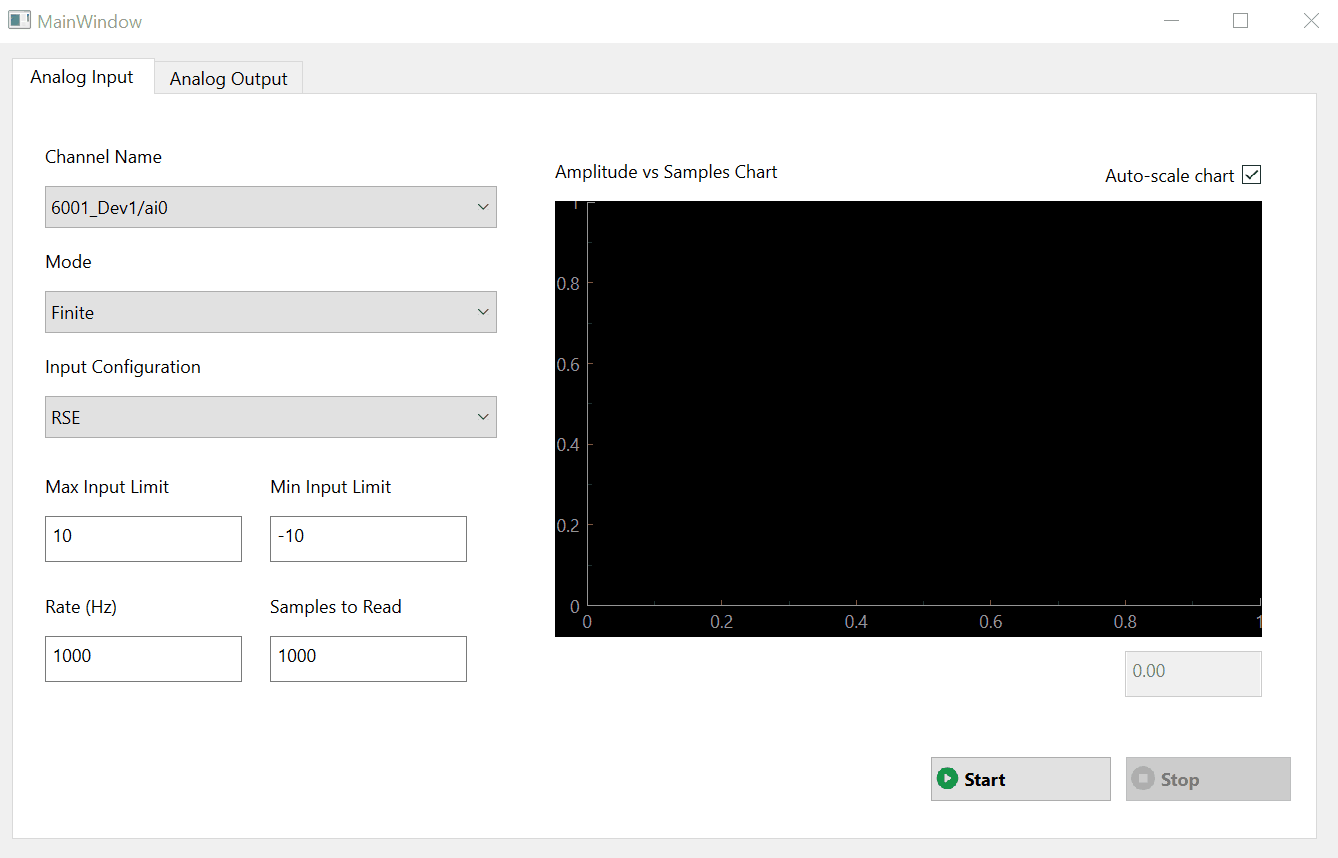
GUI
On this visualization method I replicated Figure 1 using PyQt6 and Qt Creator. If you are not familiar how to create GUIs, I recommend reading [Ref 3] first.
To run this example, you need the ni_daq_ai_single_finite_gui.py and ni_max_Finite.ui files available on the Python Files section.
Note: ni_max_Finite.ui builds from ni_max_onDemand.ui. If it is hard to follow the code for ni_daq_ai_single_finite_gui.py, I would recommend understanding the code for the ni_daq_ai_single_demand_gui.py first and then understand the additional changes.
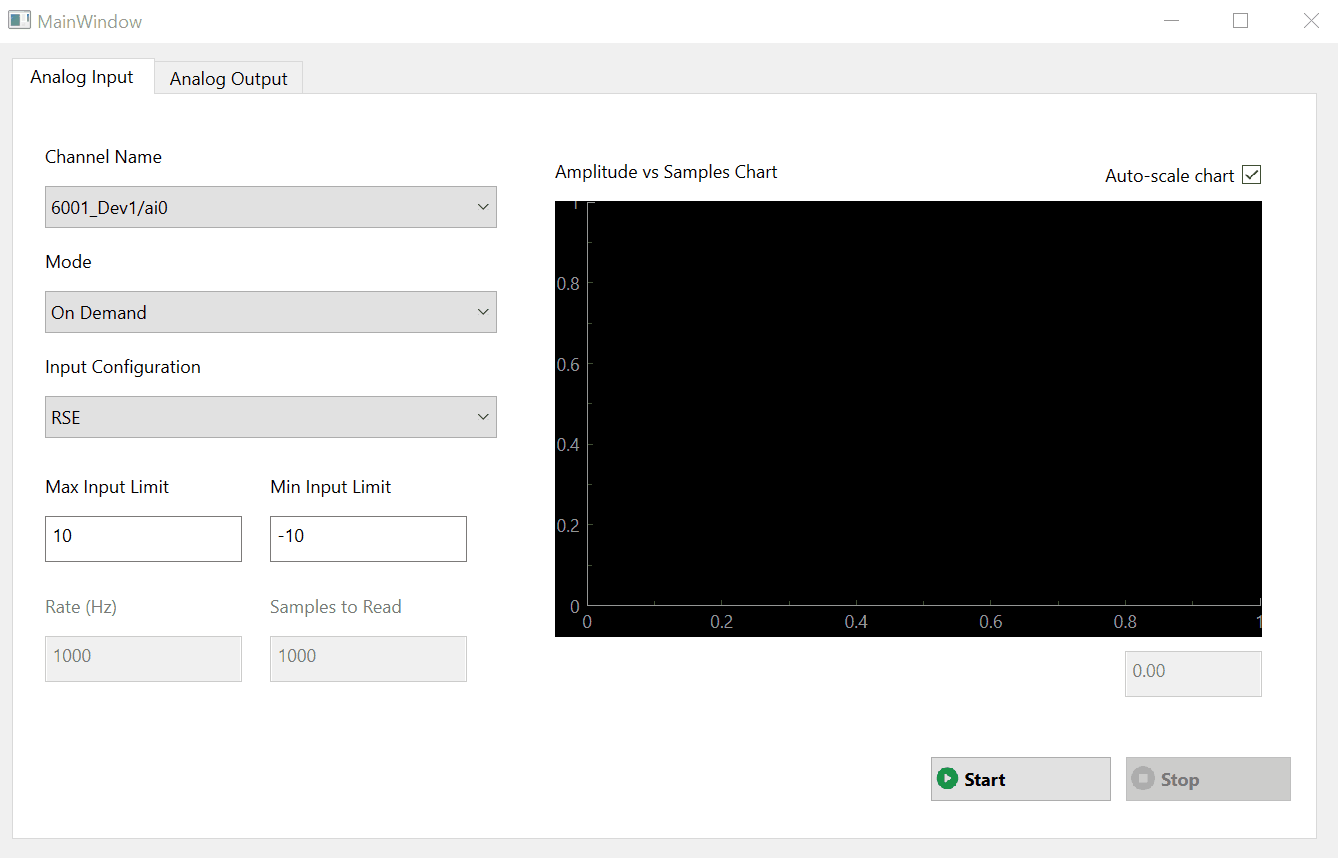
You can adjust the Rate and Samples to Read parameters according to your needs.
Note: do not press the stop button while acquiring data in finite mode. The code inside the QThreads is not finished to handle this feature. This will be fixed in a later version.
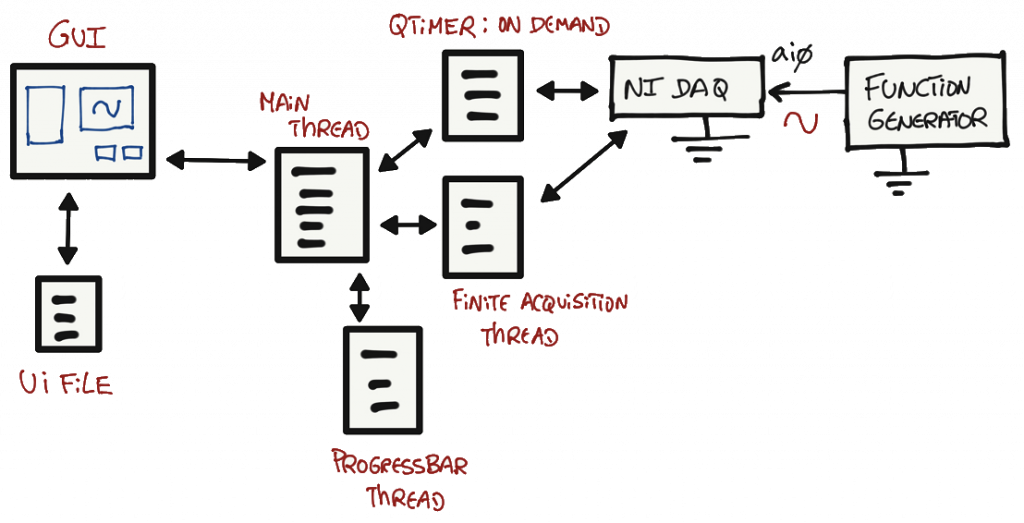
Code Diagrams
The goal with this section is to provide several different types of block diagrams that allow the understanding of the GUI code.
The first diagram is a generic block diagram on how the code, GUI, ui file and external hardware interact with each other in an conceptual way.
The second diagram was generated using code2flow and finds all function definitions in the code, and determines where those functions are called.

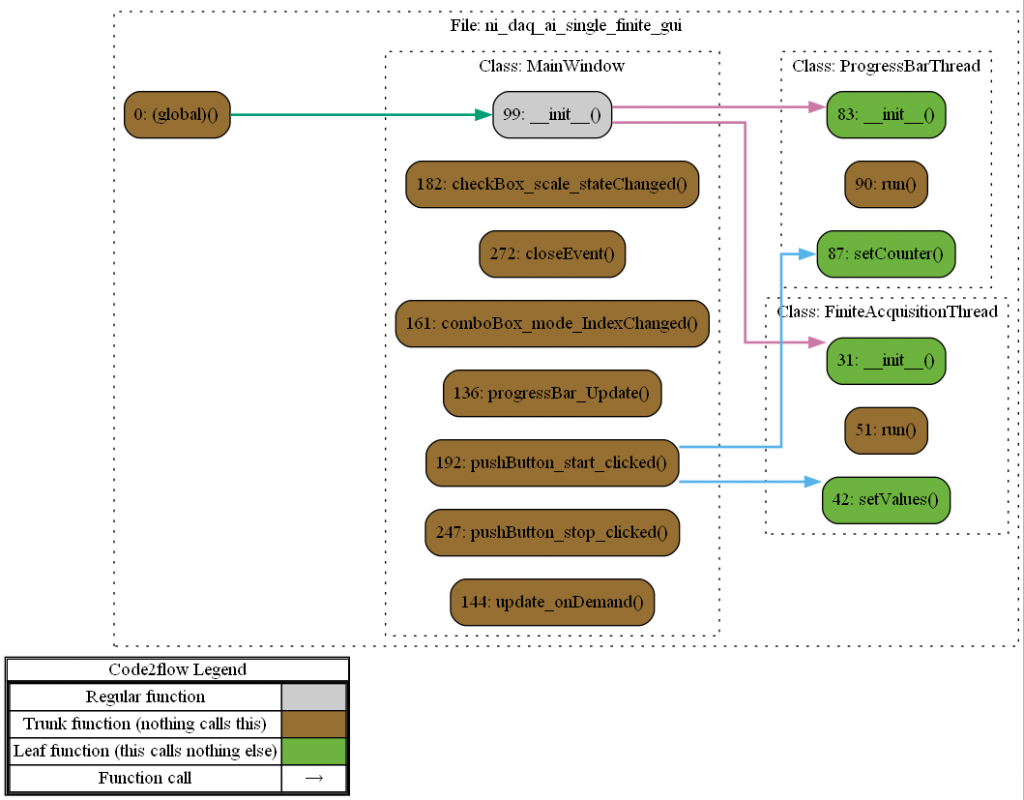
The above diagram provides a good estimate of the project's overall structure.
When not to use it...
If your goal is to capture and plot analog values at the same time, you shouldn't use this mode. Check continuous acquisition mode for real time acquisition/plotting and on demand acquisition mode for acquiring/plotting data without real time constraints.
References
- [Ref 1] “Plotting with Matplotlib”, pythonguis Website [Article]
- [Ref 2] Pyqtgraph examples -> run command: python3 -m pyqtgraph.examples
- [Ref 3] “Simple Qt GUI”, EngrEDU Glue Article [Article]